Pan de Coco Recipe | Soft, Dense, and Delicious Filipino Coconut Bread (No Mixer Needed)
Pan de Coco Recipe
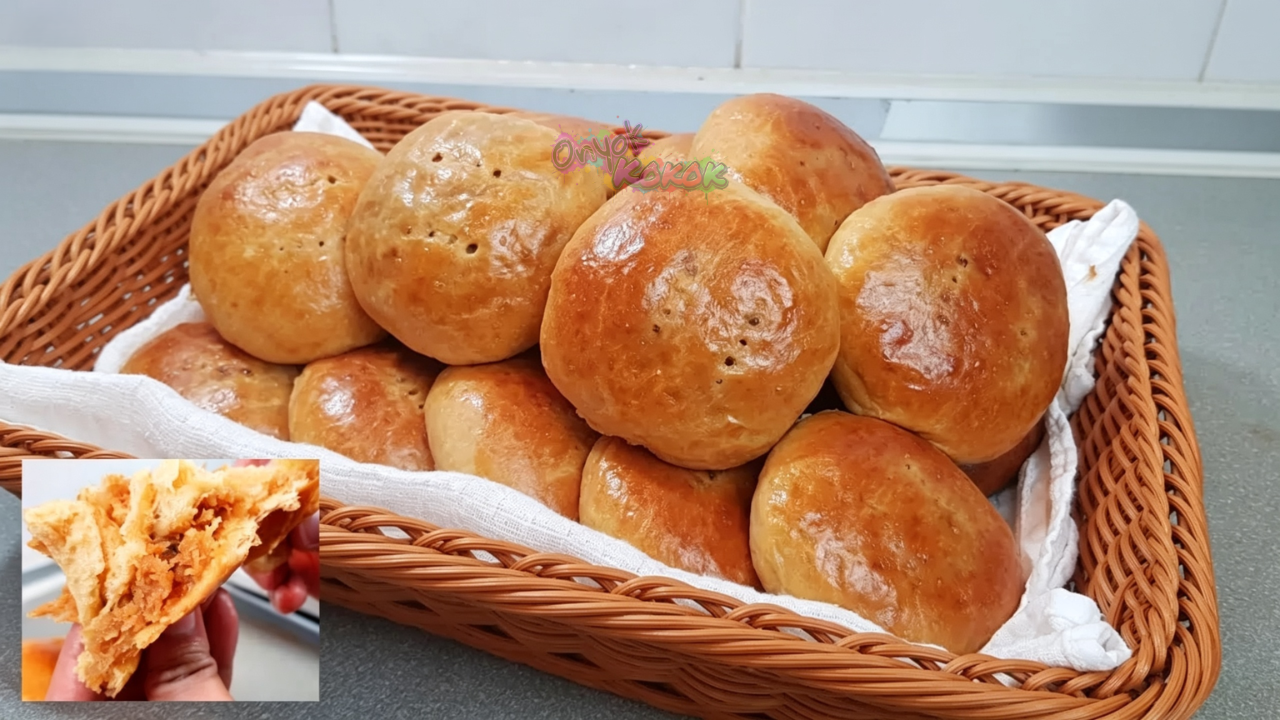
Pan de Coco Recipe is one of the most beloved Filipino bread recipes that has been enjoyed for generations. This classic Pinoy bread features a soft and slightly dense bread filled with a rich, buttery coconut filling that is sweet, fragrant, and incredibly satisfying. Whether you grew up buying it from your neighborhood bakery or you’re making it for the first time, this homemade Pan de Coco recipe will surely become one of your favorite bread recipes.
Unlike some versions that have a very sweet filling, this recipe has a more balanced flavor. The filling is buttery, coconut-rich, and just sweet enough to let the natural flavor of fresh grated coconut shine. The bread itself is soft, slightly chewy, and has that satisfying dense texture that many Filipinos love.
The best part? You don’t need a stand mixer! This is a no mixer Pan de Coco recipe, making it perfect for beginners and home bakers. With a little patience while kneading and proofing, you’ll be rewarded with bakery-quality homemade Pan de Coco that tastes even better than store-bought.
If you’re looking for a delicious Pinoy merienda, breakfast bread, or something to enjoy with coffee or hot chocolate, this Pan de Coco recipe is definitely worth trying.
Best Pan de Coco Recipe 6 Tips
1. Blooming Instant Yeast Is Optional but Very Helpful
Although instant yeast can be mixed directly with the flour, I still recommend blooming it first in warm water with a little sugar. Why?
- It confirms that your yeast is still active.
- It prevents wasting ingredients if the yeast is already expired.
- You’ll see bubbles and foam after 5-10 minutes if the yeast is alive and ready to use.
If nothing happens after 10 minutes, it’s best to use a fresh batch of yeast.
2. Don’t Add Too Much Flour While Kneading
This dough is naturally sticky during the first few minutes. Many beginners immediately add extra flour because they think the dough is too wet.
Don’t.
As you continue kneading for about 10-15 minutes, the gluten develops and the dough gradually becomes smoother, more elastic, and easier to handle. Adding too much flour will make the bread dry, heavy, and less soft. Trust the process and keep kneading.
3. Why Combine Bread Flour and All-Purpose Flour?
This recipe uses both bread flour and all-purpose flour to achieve the perfect balance.
- Bread flour contains more protein, creating stronger gluten that gives the bread its chewy structure.
- All-purpose flour has less protein, making the bread softer and more tender.
Using both gives you Pan de Coco that’s soft, dense, and pleasantly chewy – just like the ones from traditional Filipino bakeries.
4. Can You Use Only Bread Flour or Only All-Purpose Flour?
Yes.
Using only bread flour
- Produces a chewier and slightly firmer bread.
- Develops stronger gluten because of its higher protein content.
- Great if you prefer a bread with more bite and chew.
Using only all-purpose flour
- Produces a softer and lighter bread.
- Slightly less chewy.
- Easier to knead because the dough develops gluten more slowly.
Both versions work well, but combining the two creates the texture that many Filipinos love.
5. Don’t Overcook the Coconut Filling
Cook the filling only until everything comes together. Overcooking evaporates too much moisture, resulting in a dry filling that becomes crumbly after baking. A moist filling keeps your homemade Pan de Coco soft and delicious.
6. Don’t Overfill Each Bread
About ¾ tablespoon of filling is ideal. Adding too much filling may cause the dough to tear or leak while baking. A properly filled Pan de Coco keeps its beautiful shape and seals nicely.
Perfect Pan de Coco Recipe
Ingredients
For the Dough
- 2 cups bread flour
- ½ cup all-purpose flour
- ½ cup dark brown sugar or muscovado sugar
- ¾ cup evaporated milk
- 1 egg
- ¾ teaspoon salt
- 4 tablespoons butter
Yeast Mixture
- 1½ teaspoons instant yeast
- ¼ cup warm water
- 1 tablespoon dark brown sugar or muscovado sugar
Coconut Filling
- 1¾ cups fresh grated coconut 220 grams
- 4 tablespoons butter
- 5 tablespoons dark brown sugar or muscovado sugar
- 4 tablespoons evaporated milk
- 1 tablespoon all-purpose flour
Other Ingredients
- Beaten egg for egg wash
- Cooking oil for greasing
Instructions
- Bloom the yeast by combining warm water, sugar, and yeast. Let it sit for 5–10 minutes until foamy.
- In a large bowl, combine bread flour, all-purpose flour, sugar, salt, egg, evaporated milk, and bloomed yeast.
- Mix until a dough forms.
- Add the butter. Knead for 10–15 minutes until smooth. Remember not to keep adding flour while kneading. The dough starts sticky but becomes smoother with continuous kneading.
- Lightly coat the dough with cooking oil.
- Transfer to a greased bowl.
- Cover and let rise until doubled in size, about 1-2 hours.
- Prepare the filling. Combine butter, grated coconut, and brown sugar in a saucepan.
- Cook over medium heat for 5 minutes.
- Mix evaporated milk with all-purpose flour.
- Pour into the coconut mixture.
- Cook for another minute while stirring.
- Do not overcook.
- Allow the filling to cool completely.
- Divide the risen dough into 20 equal pieces weighing approximately 45 grams each.
- Shape into balls.
- Flatten each dough ball.
- Place about ¾ tablespoon of filling in the center.
- Seal tightly and gently flatten again.
- Using a fork, poke small holes on top.
- Cover and let rise for another 30 minutes.
- Brush with beaten egg.
- Bake in a preheated oven at 180°C (356°F) for 18-20 minutes.
- Allow to cool slightly before serving.
- Enjoy your homemade Pan de Coco while warm.
Other Ways of Cooking – Air Fryer
You may cook Pan de Coco in an air fryer.
- Preheat to 160°C.
- Air fry for 10-14 minutes.
- Cooking time varies depending on the air fryer model and bread size.
- Check after 10 minutes to prevent over-browning.
Storage
Room Temperature
Store in an airtight container for up to 2 days.
Refrigerator
Store for up to 5 days. Reheat in the microwave for about 15-20 seconds or warm in the oven before serving.
Freezer (Recommended)
You can freeze the unbaked, filled dough after shaping. After wrapping each Pan de Coco, arrange them on a tray and freeze until firm. Transfer to a freezer-safe bag or airtight container and store for up to 2 months.
When ready to bake:
- Thaw overnight in the refrigerator or for 2-3 hours at room temperature.
- Let the dough complete its final rise until puffy.
- Brush with egg wash and bake as directed.
You may also freeze fully baked Pan de Coco for up to 2 months. Reheat before serving.
Frequently Asked Questions
Why is my dough sticky?
This is completely normal. Resist adding too much flour. Continue kneading and the dough will become smoother as gluten develops.
Can I use desiccated coconut?
Fresh grated coconut gives the best flavor and texture. If using desiccated coconut, rehydrate it slightly with evaporated milk before cooking the filling.
Can I use white sugar?
Yes. However, dark brown sugar or muscovado sugar gives the filling a deeper caramel flavor, richer color, and more traditional Pan de Coco taste.
Why do I need to poke holes on top of the dough?
The small fork holes are one of the signature features of traditional Filipino Pan de Coco. They give the bread its classic bakery-style appearance that’s instantly recognizable. As a bonus, the holes also allow a little steam to escape during baking, which can help reduce excessive puffing and keep the top more even.
Can I prepare the dough ahead of time?
Yes. After the first rise, you can refrigerate the dough overnight. The next day, let it sit at room temperature for about 30-60 minutes before shaping, filling, and proceeding with the final proof.
Why did my Pan de Coco turn out dense?
A dense loaf is usually caused by one or more of the following:
- Under-kneading the dough
- Using inactive or expired yeast
- Not allowing the dough enough time to rise
- Adding too much flour while kneading
Following the recipe carefully and giving the dough enough time to develop will help you achieve soft, tender Pan de Coco every time.
Pan de Coco Recipe Video
For more recipe videos, visit our YouTube channel, Onyok Kokok, by clicking the link below.
https://www.youtube.com/@onyokkokok8538
Discover more step-by-step written recipes by clicking the link below.
Filipino Recipes & Cooking – Onyok Kokok Kitchen
Final Note
This homemade Pan de Coco recipe is proof that you don’t need expensive equipment to make bakery-quality Filipino bread at home. With its soft, dense texture and rich coconut filling, it’s a wonderful treat for breakfast, merienda, baon, or even dessert. Take your time with the kneading and proofing process, avoid adding too much flour, and you’ll be rewarded with delicious homemade Pan de Coco that’s worth every minute. Once you try this recipe, you’ll understand why this classic Pinoy bread remains a favorite in Filipino bakeries.